Saturday, August 25, 2007
Outta My Head 1
Just some warm ups done before a life drawing session last night at UC Berkeley [which I didn't get much out of as I was drawing on the DARK SIDE...but I'll know better where to sit next time].


Tuesday, August 21, 2007
Accepted Into Animation Mentor Program
In all my excitement at having been excepted into the winter term at Animation Mentor last week, I totally forgot to even post the news here. I couldn't be more excited to finally get down to business and pursue a passion of mine that has been brewing for quite some time. The school is online, but have offices in Emeryville, Oakland's neighbor and I'm gonna go visit their offices sometime in the next few weeks. I've heard NOTHING but positive feedback from students enrolled or graduated from this school as well as having talked to folks in the industry. Below is from a news clip that will give you some insight into what I embarking upon:
Can't wait to get in there and start animating surrounded by a wonderful bunch of creatives.
Can't wait to get in there and start animating surrounded by a wonderful bunch of creatives.
Friday, August 17, 2007
DT: Walk Cycle | Begin Upper Body Animation
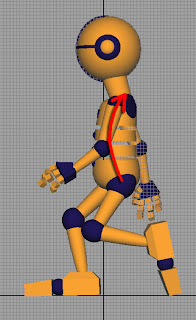
It's now time to add a little forward and backward movement to the upper body as well as adding a little rotation to the hips, back, chest and head. At this stage, we'll also offset the curves in the graph editor for the hips, back, chest and head to begin to create some follow through.
1. Our first and last CONTACT POSITIONS should find our upper body somewhat straight up and down.
2. As our character begins to move fwd, at our 1st DOWN POSITION we should rotate the upper body back slightly to balance the fwd momentum.

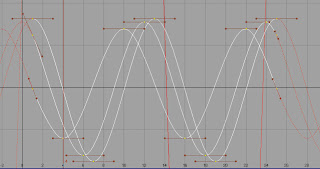
3. We offset every curve one frame over except for the center of gravity node. So, the back would be offset one frame over from the COG, the chest one frame over from the back, and the head one frame over from the chest as such:

4. When you shift the animation curves over, you're going to get keys that move out of the desired time frame, wo we use the INSERT KEYS TOOL to insert keys where we need them, and delete the keys that fall outside the time frame [for instance, keys will need to be inserted at frame 1 a lot and at frame 25 and then keys beyond 25 will need to be deleted].
5. After inserting the keys, the graphs need to be adjusted to get nice flowing curves.
DT: Walk Cycle | Adding Side-To-Side to Ankles
Our character has a custom attribute on its foot called "Side-to-Side". This attr allows us to twist the foot such that the upper toe can be higher than the other toes and vice versa:

1. At the 1st and last CONTACT POSITION, we want our little toes closer to the ground.
2. When we plant the foot on the ground, we want to set the "Side-to-Side" to a value of zero so we get the foot to be flat on the ground. We want to keep the foot flat until the 2nd DOWN POSITION.
3. After the 2nd DOWN POSITION the foot will begin to twist again such that the little toes are pointed closer to the ground.
DT: Walk Cycle | Moving Feet to Balance Body
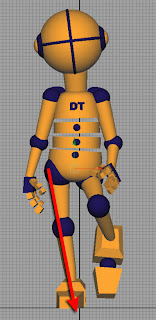
When we walk, our feet don't really stay in line with the outer edge of our hips [if they did we'd tip over], rather they move toward the center of our body to where we get almost a diagonal line from our hip down to our foot such as this:

1. The foot making contact at our CONTACT POSITIONS will be the one that goes under the body.
2. We don't want our foot to "float" outward as it moves back, so we hold the foot under the body in the same spot in Translate X [when looking from the front] until the second CONTACT POSITION [so the key at the 1st and 2nd CONTACT POSITIONS will have the same values].
3. After the 2nd CONTACT POSITION, key the foot so it begins to move away from the center.
DT: Walk Cycle | Adjust Heel Pivot
In the previous stages we were focussed on getting the motion of our character to look good from a side view. Now we begin to focus on some movements that will add convincing movement and weight from the front point of view. Here we want to:
1. Point the toes outward while they are in the air.
2. Begin to point the toes less outward, but not inward yet as the foot hits the ground. We don't want any inward/outward toe movement from the frame where it hits the ground [in our case the DOWN POSITION] all the way through the 2nd CONTACT POSITION so we need to set the same value for our toes on the 1st DOWN POSITION and the 2nd CONTACT POSITION.
3.On the 2nd DOWN POSITION, we want our toes to begin to point outward again as the foot goes into the air and begins passing the other foot.
DT: Walk Cycle: Stage 4 | Peak Pose Positions
At this the last major stage of the walk cycle. Here we find our character will have its hips brought up to their highest level. Here are some important highlights/aspects of this stage:
1. We want to pull the hips high enough [in Translate Y] to where we find the that the leg making contact with the ground is doing so just on its toes while staying straight [no bent knee].
2. We now want to spend a little time manipulating our animation graph to begin to add some weight to the character. It's helpful to work on the graphs as we build the motion and weight into the character so we don't have to go back later and edit a bunch of graphs all at once [at this stage of the game anyway].
3. We started adding some weight to the hips along the Translate Y values. Start by FLATTENING TANGENTS for all keys. The hips should slam down, so in order to achieve this, we want to build our graph to resemble the following:


4. We now want to smooth out the graph on out HIP SWAY custom attribute so that the graph would look like:

5. Finally we begin to add a little weight to the feet so they appear to slam down as they hit the ground.
DT Walk Cycle Stage 3 | Passing Positions
At this stage we'll be concentrating on setting up the largest movements of the lower body at the PASSING POSES. Some aspects to keep in mind are:
1. The hips will begin to move back up from the down position and will be slightly higher than they are at the CONTACT POSITIONS, but not as high as they will be at the PEAK POSITIONS.
2. At the PEAK POSITIONS, we find that the leg which began at the cycle from the front of the body as is moving bkwrds will become straight with a locked knee [IMPORTANT aspect of this position]. The heel of this foot will be raised only slightly off the ground as it the foot begins to slowly prepare to go up into the air after the next CONTACT POSITION.
3. The foot that began the cycle from the back is now starting to take a fwd position and is now completely off the ground.
TIP: Plant the foot flat on the ground [kill all values in any custom attr] of the leg that will become locked BEFORE raising the hips up into the air. Raising the hips upward with a foot flat on the ground will give you fairly close to what you want in terms of the back of the heel moving off the ground slightly= HIPS DRIVING HEEL! Then, we can use a custom attr [in our case the "Raise Ball"] to get the toes to stick to the ground.
4. Raise the other foot up in the air on Translate Y just a tad.

DT: Walk Cycle Stage 2 | Down Position
The next stage of our walk cycle finds us sorting out the first big movements happening on what's considered the DOWN POSITION of our character's walk. Key areas to notice and implement are:
1. At each DOWN POSITION [two key frames in this case] finds one foot firmly planted on the ground and the other with its heel tilted at an upward angle such that just the very tippy toes are grazing the ground as this foot is getting ready to go up into the air and pass the other foot at the PASSING POSITIONS.
2. The center of gravity should be lowered to its lowest point at each DOWN POSITION.
3. The foot that begins the cycle should now be planted flat on the ground at the 1st DOWN POSITION as it begins to move backward. At the 2nd DOWN POSITION, the foot that began at the back is the one moving fwd and gets planted flat on the ground.
4. At the 1st DOWN POSITION, a good working method to get the foot raised just how we want it is to start with it firmly planted on the ground and then adjust some custom attributes to angle it up how we prefer. In our case we zeroed out our custom attrs and pushed the foot bkwrd along the Z axis until the heel began to raise off the ground and rested only on the toes.
5. Next we adjusted our Raise Toe custom attr to get the desired sharp bend in the knee area. Here's a pic to show what I mean:

6. At the 2nd DOWN POSITION, we make the same adjustments as above only on the opposite foot.
7. Now that we've made these adjustments, if we were to toggle between our two DOWN POSITIONS, we'd find that one foot is positioned far more fwd. We can fix this in our animation graph for the Translate Z values. We want the first part of our curve to come straight in and then ease out. To achieve this we take the 1st key and make it LINEAR TANGENTS, We then select the 2nd key and BREAK its TANGENTS and adjust the left side so the curve comes straight in while providing the ease-out on the right side. We then FLATTEN TANGENTS on the last key and this places our fwd foot at each DOWN POSITION, in the same spot. Here's an example of the graph:

Friday, August 10, 2007
DT: Walk Cycle Stage 1
I'm re-watching the DT Walk Cycle videos to ingest and LEARN the concepts at this basic level of learning body mechanics. As a budding animator [and like learning any art form], I want to get the basics buried deep into my subconscious so I can spend more mental energy working about performance and the art of animating. Plus, since this is essentially an online notebook of my journey into learning animation I want to detail the process a bit extensively.
In the posted video here, I've established the contact positions [the points in time where the feet make contact with the ground] for the lower part of the body. Some of key areas we touched upon were as follows:
- Wanted to lower the center of gravity a bit to encourage the knees to bend slightly.
- Rotate forward the side of the hip of the leg extending forward.
- We're trying to establish a good side profile before worrying about any other angles.
- Move one of the feet fwd [using some kind of established foot control in the rig]. We move this fwd beyond where it really should extend to account for the fact that we'll pull it back slightly when we rotate the heel so the toes point up in the air.
- The rig should have an attribute [in our case called "Raise Heel"] that allows you to lift the toes and pull them towards the calf.
- We then pushed the opposite foot backwards to a point where tt's extended and we don't get any knee bend because we'll handle the knee bend through a couple of custom attributes.
- Our rig has an attribute titled "Raise Ball" that allows us to arch the foot. In this case, we want to set the attribute in such a way that it brings the rear portion of the foot fwd towards the knee. In conjunction with this, we set another custom attr titled "Raise Toe" to a position that gives our leg the desired knee bend.
- Our first and last frame should have equal positions of the body parts and hence each attribute will have the exact same values.
- At the mid contact point we'll reverse the position of our legs and essentially place the attr values from one leg on to the other..switching values between the two.
- In the graph editor we want to set up a Pre and Post Infinity view. Do this, inside the graph editor:
- Curves>Pre Infinity>Cycle
- Curves>Post Infinity>Cycle
- View>Infinity
Thursday, August 9, 2007
Digital Tutors Walk Cycle Ver 1
So I just wrapped up the Digital Tutors Walk Cycle. I want to go through this tutorial a few more times to REALLY digest the content [whizzes by a tad fast] and get the lessons into my subconscious before I move on and tackle some of their other Body Mechanics lessons all in prepping for Animation Mentor.
Monday, August 6, 2007
Digital Tutors Walk Cycle
Just a quick screen grab of me going through the Walk Cycle DVD from Digital Tutors. Will post a movie in a day or so when it's complete and I get a chance to throw it up.


Wednesday, August 1, 2007
Cafe Drawings
So, I just got back from this year's SDCC and man am I on an inspiration HIGH!!! I've decided I need to just draw more and more and more as it's an important observation tool for the animator and will only further inform my 3D animations so I've decided these drawings are worth putting here. Here are tonight's cafe drawings. I hope to get more of these in on a weekly basis. I do one night of life drawing from models and you can view these Tuesday night life drawings here: Tuesday Drawings
Some silhouette pen drawings on a scrap of cardboard I had in my bag. Just love the characters that develop through this method.

Cast of characters in the tea house.

Below are mostly just free form silhouette pen drawings.

Some silhouette pen drawings on a scrap of cardboard I had in my bag. Just love the characters that develop through this method.

Cast of characters in the tea house.

Below are mostly just free form silhouette pen drawings.

Subscribe to:
Comments (Atom)

