Sunday, December 16, 2007

Disney Animation Supervisor, Jason Ryan Delivers Animation Tutorials


Came across Jason Ryan, a supervising animator at Disney and mentor at AnimationMentor. I highly recommend heading over to his website and registering for the newsletter [just got my first two today] as they are packed with animation tutorials. His website is still under construction [mostly I assume because he's working hard on making the tutorials at the moment...so far about ten of 'em!].

Saturday, December 15, 2007

Tutoring Session 5

Want to come back and put some more detailed notes here, and in a few other posts below...and will do so after tutoring is over [don't you love you can edit past posts that way?!]. For now I am working on turning the lower half of a character around 180 degrees. Below is what I submitted earlier this week to Stephen. It's pretty rough still...kind of robotic...but much better than what we looked at during out last session. Biggest note out of the last session was making sure the body's weight shifted to the weight bearing leg well before the other leg started lifting off the ground....and of course to be on the look out for arcs in the hip area [will break that down when I edit this post].

Feedback welcome...as a beginner really trying to nail down body mechanics and figure out a good working method in Maya.


-As you can see the end isn't quite worked out yet...legs are a bit off..too far of a stretch.
-I've got some leg popping happening..part of what I think is leading to a mechanical feel.
- Animated this pretty much straight ahead, though I knew roughly the poses I wanted to hit. Of course at the moment I'm not quite hitting them.

Wednesday, December 12, 2007

Received AnimationMentor Log-In

Fun day! Just got an e-mail from AM to set up my account for school, fill out my profile and watch some orientation videos! Soon we're be able to cruise the virtual campus as well. WhooHoooo!

Sunday, December 9, 2007

Tutoring Update

Well...it's been a little while since I posted anything. I'll post some more detailed posts soon, just been SUPER busy animating and with work. In a nutshell, Stephen and I decided to pull back on the character jump since it was a bit of a, uh, "LEAP" from the bouncing ball. I did a couple of overlap and drag excercises [which I will post soon w/ notes, etc.]. Then of course we had a week off and now I'm back at it incorporating the overlap lessons into a 180 degree character turnaround of just the lower body.

I did some planning drawings outta my head, shot some reference material and then made some drawings from the footage using FlySketch [allows you to draw on top of anything on the screen] to build a little animatic. You can see the animatic below. Trying to do more pre-planning before jumping into Maya on this one.


Tuesday, November 20, 2007

New Character Jump Stage 2

So I had to do some traveling for work and have been busy with the tutoring assignment and am just now getting around to making a new post. As part of my tutoring session, in addition to to tweaking the ball bounce, I was given a new character model and asked to try out a new character jump and explore a new working method called Layering. I will go into this in more detail after tonight's session and will post the notes, what I'm trying to achieve with the jump and other general comments post the third session. Can't believe we're half way through this thing already! Feel I'm still in a little ditch just before the base of the Animation mountain. Could use another six weeks after this....oh wait, I begin AnimationMentor just around the bend.

Below are a side shot and a perspective shot of my character jump:


Friday, November 9, 2007

Ball Bounce Part Tres

Sent in my new ball bounce post first session, and Stephen was kind enough to offer some feedback...basically the new bounce was REALLY good, but had one minor blip of strobing in the first bounce due to the contact position being slightly too far over to the left of the incoming arc of motion. See here is a diagram of the old incoming bounce:


Now I corrected that position and made a slight downward move in the spacing of the ball two positions back just before contact. Here's the new bounce diagram followed by the movie of the new bounce:


More Tips from Session 1

New Bounce w/ 3D Ball

with the 3D ball this time

Thursday, November 8, 2007

Tutoring Session 1: Recap Related to Ball Bounce

So I had my first meeting with Stephen Gregory of Pixar this past Tuesday. It was a stellar feeling to be in the presence of a master animator. Stephen is really down-to-earth and definitely has quite a zeal for this art form.

Our first session was jam-packed with info leaving me with a lot to absorb, digest and apply to the first two assignments [ball bounce and character jump]. I'll first tackle the ball bounce and then in another post I'll discuss the critique of the jump.

Basically what came out of the critique from the bouncing ball is: SPACING [since my timing seemed pretty good and I think a lot of folks have a pretty good sense of timing, but it's the spacing that seems to take a lot of practice...I know it's gonna for me!]

Stephen thought the ball bounce was really good with the overall timing and animation working well. The problem area though, lies in the fact that the bounce suffers from what is known as STROBING.


In the case of my bounce, I'm getting strobing mostly where the ball makes contact with the surface. This is due to the gap being too large between the ball in the air and the ball on the ground in the next frame.


In addition to that gap being too large, the next position of the ball taking off is too similar in location to the spot where the ball was before contacting the surface. This makes it seem like the ball was in the same place in the air for two frames and enhances the strobing effect.


The problems that occur in the bouncing ball scenario occur in all other animations which is what makes this exercise such a good one to master.

So, I've gone and implemented these critiques into the ball bounce and re-shot the scene.


Here's a look at the break down of each "drawing" or pose [since this is 3D animation after all]:


Here's a look at the spacing between the poses just before the ball contacts the surface:


Here's a look at the Graph Editor of the Translate Y for those of you into that kinda thing:


Now on to a new character jump using a new character rig and implementing a new working method which I'll discuss in another blog posting.

Wednesday, October 31, 2007

Assignments Delivered!

Delivered my assignments to Spline Dr. Stephen. We have our first meeting next Tuesday. Can't Wait!!!

Ball Bounce: Tweaked

Megan Condron, an AnimationMentor student whom I met online was kind enough to give me some feedback on my ball bounces and I've implemented that into my bounces. Here's what Megan had to say [cause it's good stuff..thanks Megan!!!]:

the first bounce:

this is a heavier ball and you're conveying that very well, but i think the height of the bounces need to decay much faster, its like you have the same bounces for both, but one just has less frames, you know what i mean? Also that being said, a ball of that weight probably wouldn't travel as far across the screen and it probably wouldn't roll as far after it stops bouncing. its nice though the timing works really well i think.

the second bounce:

this one looks pretty good over all. i noticed the drop before the second and third bounces hit a little hard, you might want an extra frame in there to make it feel lighter as you have in the first and last few bounces. the rotations look really good.

It's the feedback from folks like Megan I am REALLY looking fwd to at AnimationMentor. Is it January yet?????


Couple of Ball Bounces

Here are a couple of ball bounces for assignment #2 that I'm submitting as part of the tutoring program with Dr. Gregory. Would like to do a few more bounces over the next couple of days exploring some other weights and then mess around a little with squash and stretch.


Tuesday, October 30, 2007

Bouncing Ball: This is A Test...Only a Test

So, I'm on to assignment #2 bouncing a ball. I filmed a tennis ball bounce the other night and have done a small test trying to get a good working method going for bouncing a ball.

I've hit a PROBLEM though. See, I can get the ball bouncing and can get in a little squash and a teensy bit of stretch using the Squash Deformer, but then I wanna rotate the thang and it rotates my Squash Handle and the squash so it don't look good. I'll figure it out, but if you're viewing and can offer any tips...lemme know. So right now you see at the end of the test the ball doesn't roll...rather it just floats.


Monday, October 29, 2007

Cheap Props and a Fixed Head Turn = Final Jump[?]

Ok, ok, so I noticed the head turn after my character landed began too soon so I corrected that and then of course one thing led to another and all of the sudden some cheap cardboard props held together with 3D glue appeared in my scene. Here are two new shots [also, these are post cleaning up my anim curves], one front and one from behind. Enjoy the shows folks!


Friday, October 26, 2007

We Have Lift Off- Final Jump?

So it looks like I got got all the limbs working and some nice motion. I think I'm finished with this assignment...or am I? Might tweak it before the due date of Nov. 1, but we'll see. Either way, looking fwd to some solid critique on this from Dr. Gregory. Tomorrow I begin the bouncing ball[s] exercise. Bought some balls from Meijer while I was visiting my folks in Indiana earlier this month. Will be bouncing those tomorrow morning...annoying the neighbors I'm sure.


Thursday, October 25, 2007

Smoothing Out Da Feet

So, I've been fighting a bit of a battle moving from the blocked-in animation to smoothing this sucker out. Oh, I've encountered some Gimbal lock in the arms [which is why I don't have them posted here yet...just fought the battle of feet today...and still need some tweaks at the end there], broken limbs along the way, etc. Plus, I've got a ton to learn about the Graph Editor but I'm on my way.

For now, enjoy a couple shots of the jump:

1. Side shot
2. Perspective shot

As always crits and comments most welcome!


Sunday, October 21, 2007

Block-In Arm Action

Worked on getting the arms in action here, as well as tweaking some of the knee and foot positions [though in this view you can't tell that].


Fixed Timing of 1st Block-In

So, upon reviewing the timing of the first block-in, I thought, "Hey! This guy is in the air WAY too loooooong! We need to speed this jump up a tad." I had the jump taking a full three seconds when it should be more in the 1 second range. So here is the new timing with lower body only action...added in an additional 1-2 extremes as well. I'll start attacking the arms next and then look at it from a front view in terms of pulling out knees, feet, arms, etc.


Saturday, October 20, 2007

Training Wheels Are Off!

So we're finally all moved in. Phew! Now I can focus more on these two assignments for tutoring. I'm posting the first pass at blocking in my character's jump. This is the first time I've animated something without following a tutorial, so the training wheels are off and like first riding a bike....you're thrilled and scared you're gonna crash, but we learn a lot from the mistakes so bring 'em on!

Oh, and at this stage of the block-in I'm only concerned with how the lower body and head are performing. I need to make some tweaks to the head here still and then I'll attack the arms.

I'm also posting a diagram of the arc of action in the hips and one knee. I take some renders and composite them in Photoshop so I can tweak parts to get the motion I want at this block-in stage. Again, I'm not sure what the best working method is, but so far this is working. Will be interesting to see how Dr. Stephen works when we start up our sessions.


Saturday, October 13, 2007

BOO! A Month of Madness

This month I'm definitely feasting and not starving! I've got two assignments to complete for Stephen Gregory by the end of the month before our tutoring session begins. I went to visit my folks for five days [of course I had that scheduled before finding out I'd have some homework]. My wife and I are moving apartments so I can have a proper office/study room, since I work at home and will be going to school from home. AND, I was just assigned a HUGE project at work, RealNetworks, that needs to be completed in the next week. Now if I could just add a few more hours to the day.......

One of my assignments is to have a character jump. I started sketching some poses on a napkin waiting in the airport, just little thumbnails of poses I imagined a jumping person would take before doing any research....just feeling it out mentally. While I'm still a beginner and finding a good working method, I first just like to imagine what the poses and motion would feel like in my head, put down the ideas and then go do some research to see how close I am and where I'm off. I think animators are essentially conveying the idea and feeling of motion and E-motion!


click to enlarge


Upon returning from seeing my folks, I picked up Eadweard Muybridge's fantastic book, The Human Figure In Motion, to study the plates of men jumping. I then began thumbnailing key and extreme poses from the plates. There are plenty of poses missing from the plates, so I tried to fill them in using my imagination. At this stage. I also looked for the arcs of motion in various body parts [images to come on this in another post] from one plate to the next. Since Muybridge's pics are of actual humans, I exaggerated my poses a bit and added in a few extremes I think will give the jump a livelier feeling.

BUT, this research of course just isn't enough as observing the real deal. Plus, I didn't have a clue how long it would take to create a basic jump. So, last night I took my MacBook to the new apartment [before we fill it up with our stuff this weekend], and filmed myself jumping with the built-in webcam. Viewing this and sketching out some more poses, will allow me to fill in the missing blanks from the Muybridge plates, get a better grip on the arcs of motion, the followthroughs, and provide me with a better sense of timing in the action.

While I'm slightly embarrassed to be posting this, I figure on the road to becoming a professional animator and life as one will involve me acting out WAY more embarrassing stunts. So, hereeeeeeeeeees the video clip of me jumping [apologies to the downstairs neighbors].


Monday, October 1, 2007

Lifting Heavy Objects: 2nd Pass Animating Feet


Tweaking the feet animation for the second section of the lift.

To Study w/ Pixar Animator

Just found out last night I was accepted into an animation tutoring program with "Dr." Stephen Gregory, a Pixar animator and contributor to the Spline Doctors blog. I'll be studying with Stephen for six weeks beginning in Nov, but like all good instructors he's given us a couple of assignments to complete prior to the first session. I couldn't be more thrilled or honored to have been selected for this AMAZING opportunity.

So for the first session I need to make a ball bounce and a character jump. So look for some WIPs related to those assignments as Nov. 1 approaches.

In sad news, I'm losing access to a car which means I might not get to the zoo as often to sketch from the animals. BUMMER! Guess the fates determined I had to trade the zoo drawing for the chance to study with Stephen.

See Stephen Gregory's animation work here: http://drstepheng.splinedoctors.com/animation.html

To read more about the tutoring program: http://drstepheng.splinedoctors.com/

And if you dig animation, go visit the Spline Doctors, they have some great podcasts too!: http://www.splinedoctors.com/

Friday, September 28, 2007

Lifting Heavy Objects: First Pass at Tweaking Feet


Just making sure feet stay planted in the first part of the ani and that the knees don't intersect the barbell.

Liftign Heavy Objects: Upper Bod 90% Complete


Tweaked out the end of the animation where the upper bod is concerned. Time to move on to the lower body before coming back to finish off the upper at the end.

Thursday, September 27, 2007

Lifting Heavy Objects Stage 4


Tweaking out some more of the upper body in this one.

Monday, September 24, 2007

Lifting Heavy Objects Stage 3


Here I'm still focusing on tweaking out the upper body in this 3rd pass. More tweaks are needed, but we'll tackle the feet before we go back and further refine the upper bod.

Zoo Drawings 2


Reading Richard Williams Amazing Book!


So I'm part of the way in to the amazing book on becoming an animator by Richard Williams, director of Who Framed Roger Rabbit. The Animator's Survival Kit is one of two main tomes for animators, the other being The Illusion of Life by Ollie Johnston and Frank Thomas [of the Disney Nine Old Men].

I wanna start noting some of highlights from my readings here, starting with some important terminology. I'd like to post some still images of animation as I go along and diagram out some of this terminology in my own efforts towards becoming an animator. So look for that in future posts.

For now, here are some terms defines:

Extremes:

- main poses that show some major change in action
- the extreme positions in movement


Keys:

- most important poses in the animation!
- these are the STORYTELLING poses
- perhaps these are the "keystones" in building a solid and successful animated sequence

Breakdowns/Passing Positions:

- these occur between extreme poses and are quite important to the action in a scene
- these poses create "arcs of action" or perhaps, "lines of action" that happen while passing from one extreme to the other

Inbetweens:

-the poses between the extremes and passing positions

FLOW OF IMPORTANCE:

Keys>Extremes>Passing/Breakdowns>InBetweens

Friday, September 21, 2007

DT| Lifting Heavy Objects Tweaking Out Upper Body


In this clip you can see we've begun tweaking out some of the upper body movements from the initial blocking stage. Will come back and add some specific comments to what was being focused on at this stage.

DT| Lifiting Heavy Objects: Blocking Extremes


Here is the first stage of blocking in the extremes for a lifting of heavy objects body mechanics. I am using the Digital Tutors DVD series for this training.

Monday, September 17, 2007

Zoo Drawings

Just joined the zoo and am making Monday afternoons a zoo drawing session. I'm in week 2, so my animal drawings have miles of improvement to go, but I thought I'd post two from today's session.


Saturday, August 25, 2007

Outta My Head 1

Just some warm ups done before a life drawing session last night at UC Berkeley [which I didn't get much out of as I was drawing on the DARK SIDE...but I'll know better where to sit next time].


Tuesday, August 21, 2007

Accepted Into Animation Mentor Program

In all my excitement at having been excepted into the winter term at Animation Mentor last week, I totally forgot to even post the news here. I couldn't be more excited to finally get down to business and pursue a passion of mine that has been brewing for quite some time. The school is online, but have offices in Emeryville, Oakland's neighbor and I'm gonna go visit their offices sometime in the next few weeks. I've heard NOTHING but positive feedback from students enrolled or graduated from this school as well as having talked to folks in the industry. Below is from a news clip that will give you some insight into what I embarking upon:


Can't wait to get in there and start animating surrounded by a wonderful bunch of creatives.

Friday, August 17, 2007

DT: Walk Cycle | Begin Upper Body Animation


It's now time to add a little forward and backward movement to the upper body as well as adding a little rotation to the hips, back, chest and head. At this stage, we'll also offset the curves in the graph editor for the hips, back, chest and head to begin to create some follow through.

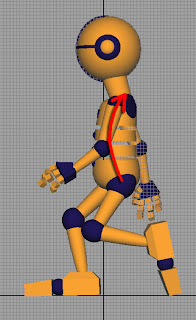
1. Our first and last CONTACT POSITIONS should find our upper body somewhat straight up and down.

2. As our character begins to move fwd, at our 1st DOWN POSITION we should rotate the upper body back slightly to balance the fwd momentum.


3. We offset every curve one frame over except for the center of gravity node. So, the back would be offset one frame over from the COG, the chest one frame over from the back, and the head one frame over from the chest as such:


4. When you shift the animation curves over, you're going to get keys that move out of the desired time frame, wo we use the INSERT KEYS TOOL to insert keys where we need them, and delete the keys that fall outside the time frame [for instance, keys will need to be inserted at frame 1 a lot and at frame 25 and then keys beyond 25 will need to be deleted].


5. After inserting the keys, the graphs need to be adjusted to get nice flowing curves.

DT: Walk Cycle | Adding Side-To-Side to Ankles


Our character has a custom attribute on its foot called "Side-to-Side". This attr allows us to twist the foot such that the upper toe can be higher than the other toes and vice versa:


1. At the 1st and last CONTACT POSITION, we want our little toes closer to the ground.

2. When we plant the foot on the ground, we want to set the "Side-to-Side" to a value of zero so we get the foot to be flat on the ground. We want to keep the foot flat until the 2nd DOWN POSITION.


3. After the 2nd DOWN POSITION the foot will begin to twist again such that the little toes are pointed closer to the ground.

DT: Walk Cycle | Moving Feet to Balance Body


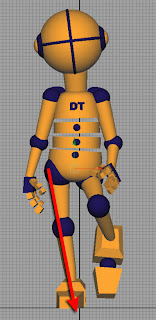
When we walk, our feet don't really stay in line with the outer edge of our hips [if they did we'd tip over], rather they move toward the center of our body to where we get almost a diagonal line from our hip down to our foot such as this:


1. The foot making contact at our CONTACT POSITIONS will be the one that goes under the body.

2. We don't want our foot to "float" outward as it moves back, so we hold the foot under the body in the same spot in Translate X [when looking from the front] until the second CONTACT POSITION [so the key at the 1st and 2nd CONTACT POSITIONS will have the same values].

3. After the 2nd CONTACT POSITION, key the foot so it begins to move away from the center.

DT: Walk Cycle | Adjust Heel Pivot


In the previous stages we were focussed on getting the motion of our character to look good from a side view. Now we begin to focus on some movements that will add convincing movement and weight from the front point of view. Here we want to:

1. Point the toes outward while they are in the air.

2. Begin to point the toes less outward, but not inward yet as the foot hits the ground. We don't want any inward/outward toe movement from the frame where it hits the ground [in our case the DOWN POSITION] all the way through the 2nd CONTACT POSITION so we need to set the same value for our toes on the 1st DOWN POSITION and the 2nd CONTACT POSITION.

3.On the 2nd DOWN POSITION, we want our toes to begin to point outward again as the foot goes into the air and begins passing the other foot.

DT: Walk Cycle: Stage 4 | Peak Pose Positions


At this the last major stage of the walk cycle. Here we find our character will have its hips brought up to their highest level. Here are some important highlights/aspects of this stage:

1. We want to pull the hips high enough [in Translate Y] to where we find the that the leg making contact with the ground is doing so just on its toes while staying straight [no bent knee].

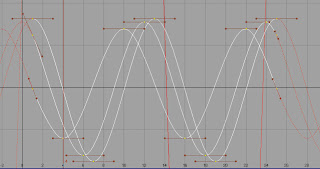
2. We now want to spend a little time manipulating our animation graph to begin to add some weight to the character. It's helpful to work on the graphs as we build the motion and weight into the character so we don't have to go back later and edit a bunch of graphs all at once [at this stage of the game anyway].
3. We started adding some weight to the hips along the Translate Y values. Start by FLATTENING TANGENTS for all keys. The hips should slam down, so in order to achieve this, we want to build our graph to resemble the following:


4. We now want to smooth out the graph on out HIP SWAY custom attribute so that the graph would look like:


5. Finally we begin to add a little weight to the feet so they appear to slam down as they hit the ground.

DT Walk Cycle Stage 3 | Passing Positions


At this stage we'll be concentrating on setting up the largest movements of the lower body at the PASSING POSES. Some aspects to keep in mind are:

1. The hips will begin to move back up from the down position and will be slightly higher than they are at the CONTACT POSITIONS, but not as high as they will be at the PEAK POSITIONS.

2. At the PEAK POSITIONS, we find that the leg which began at the cycle from the front of the body as is moving bkwrds will become straight with a locked knee [IMPORTANT aspect of this position]. The heel of this foot will be raised only slightly off the ground as it the foot begins to slowly prepare to go up into the air after the next CONTACT POSITION.

3. The foot that began the cycle from the back is now starting to take a fwd position and is now completely off the ground.

TIP: Plant the foot flat on the ground [kill all values in any custom attr] of the leg that will become locked BEFORE raising the hips up into the air. Raising the hips upward with a foot flat on the ground will give you fairly close to what you want in terms of the back of the heel moving off the ground slightly= HIPS DRIVING HEEL! Then, we can use a custom attr [in our case the "Raise Ball"] to get the toes to stick to the ground.

4. Raise the other foot up in the air on Translate Y just a tad.


DT: Walk Cycle Stage 2 | Down Position


The next stage of our walk cycle finds us sorting out the first big movements happening on what's considered the DOWN POSITION of our character's walk. Key areas to notice and implement are:

1. At each DOWN POSITION [two key frames in this case] finds one foot firmly planted on the ground and the other with its heel tilted at an upward angle such that just the very tippy toes are grazing the ground as this foot is getting ready to go up into the air and pass the other foot at the PASSING POSITIONS.

2. The
center of gravity should be lowered to its lowest point at each DOWN POSITION.

3. The foot that begins the cycle should now be planted flat on the ground at the 1st
DOWN POSITION as it begins to move backward. At the 2nd DOWN POSITION, the foot that began at the back is the one moving fwd and gets planted flat on the ground.

4. At the 1st DOWN POSITION, a good working method to get the foot raised just how we want it is to start with it firmly planted on the ground and then adjust some custom attributes to angle it up how we prefer. In our case we zeroed out our custom attrs and pushed the foot bkwrd along the Z axis until the heel began to raise off the ground and rested only on the toes.

5. Next we adjusted our Raise Toe custom attr to get the desired sharp bend in the knee area. Here's a pic to show what I mean:


6. At the 2nd DOWN POSITION, we make the same adjustments as above only on the opposite foot.

7. Now that we've made these adjustments, if we were to toggle between our two DOWN POSITIONS, we'd find that one foot is positioned far more fwd. We can fix this in our animation graph for the Translate Z values. We want the first part of our curve to come straight in and then ease out. To achieve this we take the 1st key and make it LINEAR TANGENTS, We then select the 2nd key and BREAK its TANGENTS and adjust the left side so the curve comes straight in while providing the ease-out on the right side. We then FLATTEN TANGENTS on the last key and this places our fwd foot at each DOWN POSITION, in the same spot. Here's an example of the graph:

Friday, August 10, 2007

DT: Walk Cycle Stage 1


I'm re-watching the DT Walk Cycle videos to ingest and LEARN the concepts at this basic level of learning body mechanics. As a budding animator [and like learning any art form], I want to get the basics buried deep into my subconscious so I can spend more mental energy working about performance and the art of animating. Plus, since this is essentially an online notebook of my journey into learning animation I want to detail the process a bit extensively.

In the posted video here, I've established the contact positions [the points in time where the feet make contact with the ground] for the lower part of the body. Some of key areas we touched upon were as follows:

  1. Wanted to lower the center of gravity a bit to encourage the knees to bend slightly.
  2. Rotate forward the side of the hip of the leg extending forward.
  3. We're trying to establish a good side profile before worrying about any other angles.
  4. Move one of the feet fwd [using some kind of established foot control in the rig]. We move this fwd beyond where it really should extend to account for the fact that we'll pull it back slightly when we rotate the heel so the toes point up in the air.
  5. The rig should have an attribute [in our case called "Raise Heel"] that allows you to lift the toes and pull them towards the calf.
  6. We then pushed the opposite foot backwards to a point where tt's extended and we don't get any knee bend because we'll handle the knee bend through a couple of custom attributes.
  7. Our rig has an attribute titled "Raise Ball" that allows us to arch the foot. In this case, we want to set the attribute in such a way that it brings the rear portion of the foot fwd towards the knee. In conjunction with this, we set another custom attr titled "Raise Toe" to a position that gives our leg the desired knee bend.
  8. Our first and last frame should have equal positions of the body parts and hence each attribute will have the exact same values.
  9. At the mid contact point we'll reverse the position of our legs and essentially place the attr values from one leg on to the other..switching values between the two.
  10. In the graph editor we want to set up a Pre and Post Infinity view. Do this, inside the graph editor:
  • Curves>Pre Infinity>Cycle
  • Curves>Post Infinity>Cycle
  • View>Infinity

Thursday, August 9, 2007

Digital Tutors Walk Cycle Ver 1

So I just wrapped up the Digital Tutors Walk Cycle. I want to go through this tutorial a few more times to REALLY digest the content [whizzes by a tad fast] and get the lessons into my subconscious before I move on and tackle some of their other Body Mechanics lessons all in prepping for Animation Mentor.

Monday, August 6, 2007

Digital Tutors Walk Cycle

Just a quick screen grab of me going through the Walk Cycle DVD from Digital Tutors. Will post a movie in a day or so when it's complete and I get a chance to throw it up.

Wednesday, August 1, 2007

Cafe Drawings

So, I just got back from this year's SDCC and man am I on an inspiration HIGH!!! I've decided I need to just draw more and more and more as it's an important observation tool for the animator and will only further inform my 3D animations so I've decided these drawings are worth putting here. Here are tonight's cafe drawings. I hope to get more of these in on a weekly basis. I do one night of life drawing from models and you can view these Tuesday night life drawings here: Tuesday Drawings

Some silhouette pen drawings on a scrap of cardboard I had in my bag. Just love the characters that develop through this method.


Cast of characters in the tea house.


Below are mostly just free form silhouette pen drawings.


Monday, July 23, 2007

Mech Blows Away Stuff

A couple stills of my Mech destroying the antennae array. It's getting close to render time for this bad boy so you can see a full animation of the lil' project.


Saturday, July 14, 2007

Added Some Snow to th Mech Scene

Will post about the process later, but wanted to throw an image up to compare to the scene below with no falling snow.


Thursday, July 12, 2007

3D Buzz Challenge


During today's 3DBuzz DVD instruction, we were producing the shading network for our snowy ground. At the end of the video, Zak [one of the two instructors] challenged the viewer to extend our network to account for the ability to have the specular color [sun's highlight on the snow] fade as it moves away from the camera. Here's a shot incorporating the solution I concocted [which I will edetail below]:


Solution:

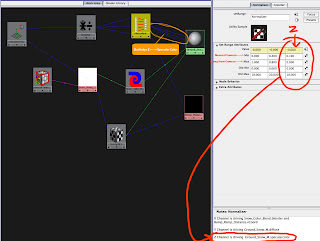
1. Put both the Color [Blender] and Bump on the same X channel in the Set Range [Normalizer] column which frees up the Z channel for use with specular color.

2. Just plug OutValZ from the Normalizer into the SpecularColor of the "GroundSnow_M".

3. In the attribute editor for the Normalizer [set range], make sure the Min= 0.18 [in my case anyway...whatever low value you need here] and that the Max = 0. This is because the MIN is nearest the camera and the MAX is furthest away.

Screenshot of solution: [click on pic for a larger version]


Mech Walks In Snow Blooper

Below is a Playblast blooper of my Mech walking in the snow. This occurs because it's just the initial setup of making the ground a soft body and setting up a collision with the shoes we built for the Mech.


It's easy to fix by simply:

1. Setting the conserve of the "Soft_Body_GroundParticle" node = 0
2. Setting the resilience of each shoe piece = 0
3. And to get rid of the "stickies" [areas where the ground is pulled upwards], one needs to Key the Trace Depth in an "on/off" fashion based on where the feet are about to collide with the ground and a frame or two when the shoes begins to lift upwards.

Currently, I'm not liking the results of the footprints left even after I make the adjustments, and will either tweak this out a bit more and/or just use blend shapes as done with the first two steps.

Sunday, July 8, 2007

Alien Abduction: Final [?] Film

Here's is my final [ well....would love to come back to this little project after I have some more Maya skills under my belt and expand and approve upon this little project, but for now am on to project 3 in the 3D Buzz training materials] short for project two- Alien Abduction.


There are a couple of areas I'm not satisfied with:

- need to go back an animate a tenticle that just sits there at the end of shot 1 [where our little alien prepares to shoot down to earth].

- also in shot one, there appears to be a shadow from an object that flies overhead- need to go back an investigate that.

As always, any feedback on this project is appreciated.

Thursday, July 5, 2007

Mech Turns Heads: Crowd Recoils

Here is pass two at the Mech walking to the antenna she intends to annihilate with her cannon. I've got some more tweaking to do, but first we're going to get schooled in some Dynamics and then come back to tweaking the animation. Let me know what you think so far!

Tuesday, July 3, 2007

Mech Walks Some More and A Camera Tries to Follow Her

So my mech is growing up fast and she's learning to walk with a tad bit of sophistication. This is still a rough walk [need to animate things like cannon swivel, "head" bobbing, etc.] along with some camera animation. The camera is animated through a rig that was built with a series of three locators, constraining one camera to all three locators and then animating their weights over time. Let me know what ya think so far!

The MEL UI Window for Mech Ani


So here's a pic of the UI I created through my first foray into MEL. The buttons at top were supposed to contain pics of the Mech for their corresponding parts, but alas Maya on my Mac refused to find them through MEL. So it's functional, just not as snazzy as I'd hoped.

Very Rough Mech Walk Cycle

This is the first pass [so VERY rough] at a a walk cycle for the Mech in my latest project. Thought it'd be fun to post this and then post the aftermath once tweaking and all other motions are incorporated into the piece. This is my first walk cycle inside of Maya.

Wednesday, June 20, 2007

MEL Woes On A Mac

So in the latest 3DBuzz project, When Mechs Attack, we're building a custom UI to facilitate the ease of selecting controls and animation attributes on our Mech, but I've hit a snag because I'm running Maya on a Mac. For some reason, Maya can't find the image files I need to place on the UI buttons [worse comes to worse I just won't have the fancy looking UI and will be reduced to using a boring button version- what fun is that?!

I've posted the query to a few message boards to see if anyone has a solution. The part of the code I'm referring to is where we house the images inside of "variables" to access them later for the buttons. I've triple-triple checked the file location paths to no avail:

string $MechRootFile ="/Users/adam_kaszycki/Documents/maya/projects/When Mechs Attack/sourceimages/Mech_Root.bmp";

string $RightFootFile ="/Users/adam_kaszycki/Documents/maya/projects/When Mechs Attack/sourceimages/melUI/Right_Foot.bmp";

string $LeftFootFile ="/Users/adam_kaszycki/Documents/maya/projects/When Mechs Attack/sourceimages/melUI/Left_Foot.bmp";

I've also tried creating a file node in the Hypergraph, mapping the file and copying the location Maya uses to access the file, sourceimages/melUI/Mech_Root.bmp, but that doesn't work either. It's gotta be a Mac bug and I'm trying to get to the bottom of it.

Anyway, just wanted to detail my frustration here as I move along.

More Mech Shots


Thursday, June 14, 2007

Modeled and Textured Mech


I've just about finished rendering out my Alien Abduction film now that all of the lighting and paint effects are complete. I do need to figure out a way to edit it all together and compress the video. So, in the meantime I'm posting the first model from the next project, "When Mechs Attack". This model has been textured as well. Enjoy and feel free to issue any comments you like.

Wednesday, May 16, 2007

Rough Animation for Shot 2 of Alien Abduction


Here is shot 2 for the Alien Abduction short [a project from 3DBuzz. So far this is still kind of rough and I'm trying to continue to wrestle with the Graph Editor in Maya to sort out the following:

  • How to make a more fluid and lively suck up of the beach ball [I know...doesn't look like it without the textures, lights, etc. in this Playblast].
  • Need to tweak out the spin when the alien launches the tractor beam.
  • When the ball goes into the cockpit and causes the alien to lose control of the ship I need to work on smoothing out the rotations a tad so they aren't quite so choppy looking...subtle stuff.

Any feedback is most welcome for any other problem areas thus far.

Friday, May 11, 2007

Shot 1 Animation of Alien Abduction [playblast]


I'm currently nearing the end of Project 2, Alien Abduction, from the fantastic DVD training materials provided by Buzz3D. This is certainly the most complex piece of animation, texturing, rigging, lighting, etc. I have delved into. In this shot, the alien comes into camera and spots our home planet and plots some sort of scheme [you'll see when I post more films].

In this shot I'm primarily concerned with:
* how to get the ship to fly in without seeming to stop too suddenly defying some sort of physics out in space
* figure out with the simple rig how to convincingly get out alien to move around, look back at the earth with a moment of shock and then turn back to the camera and indicate his plotting scheme [rubbing his tentacles together]
* I also added a little wave as he blasts towards earth

There are plenty of things I could work on I am sure, but sometimes you gotta take your limited knowledge and move on to the next thing for more insight.